With all the festivities and parties going down at the moment I decided to challenge myself and make something I have never made before as the centrepiece of this years dining table. I have made gingerbread men many times before so after seeing the all mighty Mary Berry and Paul Hollywood whip up a gingerbread house on The Great British Bake Off Christmas Special I knew I had to have ago at this one myself.
Monday 23 December 2013
Thursday 19 December 2013
BROWN PAPER AND BAKERS TWINE.
With Christmas day less than a week away I expect you all to be knee high in gift wrap an sellotape by now but I thought it would still be nice to share with you my take on gift wrap for this wonderful season.
Saturday 14 December 2013
WRAPPZ PERSONALISED CASES.
I have mentioned on the blog before that I am a sucker for a personalised phone case so when the people from Wrappz asked me whether I wanted to try one out and offer all my blog readers a discount code to get a free case/skin I would have been a fool to say no.
Thursday 12 December 2013
RECIPE: VANILLA SNOWFLAKE CUPCAKES.
This weekend I had a friend over to have a bit of a catch up and chin wag and couldn't pass up the opportunity to whip up some cupcakes. I didn't have a huge selections of ingredients in the cupboards so decided to stick with good old faithful vanilla cupcakes and get a little festive with the decorating. All you need for the recipe is some large cupcake cases, a baking tray, baking paper, a piping bag and a snowflake cutter that you can pick up from most craft shops or online for a couple of pounds.
Saturday 7 December 2013
HOME AT CHRISTMAS.
I wanted to share with you today a few snaps from around my home now that we have finally completed decorating our Christmas tree! This post also debuts the first appearance of Poppy the cat, a birthday gift from the boyfriend that never fails to melt my heart and drive me round the bend on a daily basis.
Thursday 21 November 2013
DIY: LABEL BAUBLES.
The first instalment of my DIY Christmas comes in the form of these cute label baubles. After the popularity of my Label Maker Ideas post I decided to follow the same vein and use my trusty Motex label maker to make some christmas decorations. I'm not going to lie, I am a little obsessed with my label maker and try to incorporate it into as many things as possible so keep your eyes pealed for more Christmas DIYs soon!
Thursday 14 November 2013
AUTUMN/WINTER NAILS 2013.
We have already established here on this blog that I am a nail polish junkie. The amount of times I have received "that look" from friends and my boyfriend for commenting that I have nothing to wear on my nails in front of a stash of 100+ polishes is criminal. Addicted, guilty as charged and whole lot of no shame. This autumn is no different and I have been dying to add some new shades to my collection, I'm looking at you Essie's winter collection. Despite this in some form of an attempt to use up what I have I decided to go on a hunt and pull out my favourite 6 shades that have been donning my finger tips for the past few weeks.
Starting from left to right we have Seche Smokey a deep charcoal with shimmer unlike any other polish I own, despite not being a huge shimmer/metallic fan when it comes to nails I adore this on the nails and is a much more flattering alternative to black. Next up we have Models Own Prussian Blue a bright royal blue that has been gracing my nails even more than my beloved Nails Inc Baker Street, this is in fact a matt polish but I have layered on my trusty Seche topcoat to make the swatch glossy as thats how I paint my nails daily, 2 coats of this and a super shiny topcoat leave you with the most perfect inky blue nails, possibly my favourite of them all! Now we move onto Seche Bella, another shimmer polish that has somehow stolen my heart, this is a deep red shimmer that is the perfect compromise between creamy colours and glitter, perfect for the christmas season! Next up we have one of my all time favourite nail varnish shades come summer or winter, Nails Inc Piccadilly Circus, the most perfect cerise pink that looks flawless all year round, hand down the nail varnish I always go to when I want a hint of berry on my nails despite photographing slightly more red in the above shots. Next is the oddball of the bunch and one i'm still not sure if i'm completely sold on but recently I keep finding myself learning towards the more taupe, violet, grey side of neutrals and Ciate Fade to Greige has been ticking all of those boxes, a nice alternative to a nude that looks lovely paired with a silver glitter topcoat and some jewellery to match. Last but by no means least we have the infamous Nails Inc Porchester Square, the most stunning nude polish on the market, with a perfect hint of grey this polish gives you that classic manicure without looking like you have mannequin hands that wash out your complexion and goes with every possible outfit under the sun.
What are you favourite nail polish shades for winter? We all know I will not be able to go 6 weeks without picking up a new shade or two so I would love to know some of your personal favourites are!
Keep up to date on:
Thursday 7 November 2013
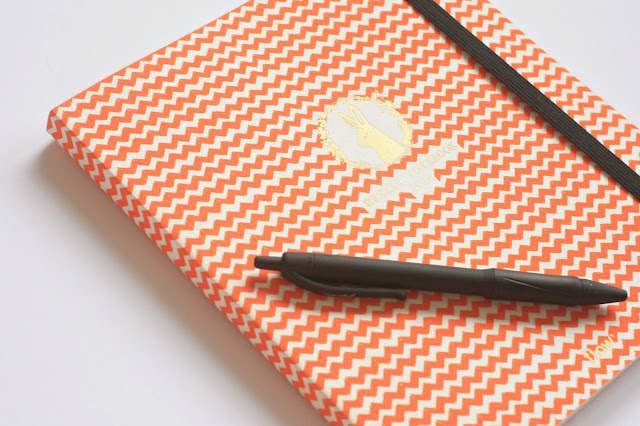
FLOW WEEKLY NOTEBOOK 2014.
Whether we like it or not the end of the year is fast approaching and just around the corner a new one is waiting to begin. With a new year comes a new diary and yet another excuse to indulge in my love for all things stationary. This upcoming year is no exception and I am all over it with this beautiful weekly notebook from Flow Magazine.
Flow is a Dutch magazine that has been my favourite magazine for well over a year now, owning all the International copies and a few Dutch ones from trips to the Netherlands, it is fair to say I almost died a little when I scrolled down my Instagram feed to see that they had got together to create this international weekly diary!
Naturally the orange chevron print with the golden rabbit are right up my street so I snapped this up right as soon as it was released about a month ago and have been longing for an appropriate time to share this with you. In true Flow style the inside of this notebook is just as beautiful as the outside. Featuring space for all of your daily appointments and notes. In the back there is a fold out birthday calendar along with a journal full of inspiring questions to help encourage creativity.
The pages of the notebook itself are strewn with adorable illustrations by the Japanese artist Aiko Fukawa and continue the wildlife theme from the cover rabbit throughout. With Flow being a magazine for paper lovers the quality of the paper and product in general is fantastic and I imagine it will easily last throughout the year. Along with the weekly notebook you also receive paper goodies in the form of mini envelopes, stickers and an adorable garland that hangs proudly next to my desk. You can order your own weekly notebook from Flow for €16.95 which is just over £14 for British readers, a bargain if ever there was one!
I'd just like to quickly apologise for my lack of posting last month. Along with no internet for total of 3 weeks, the boyfriend passing his driving test and myself buying a Mini Cooper life has been a bit all over the shop. No need to sweat though, the internet is back and my creativity is bubbling over after being stifled for a month, I hope you are ready for all the festive DIYs coming your way!
Friday 18 October 2013
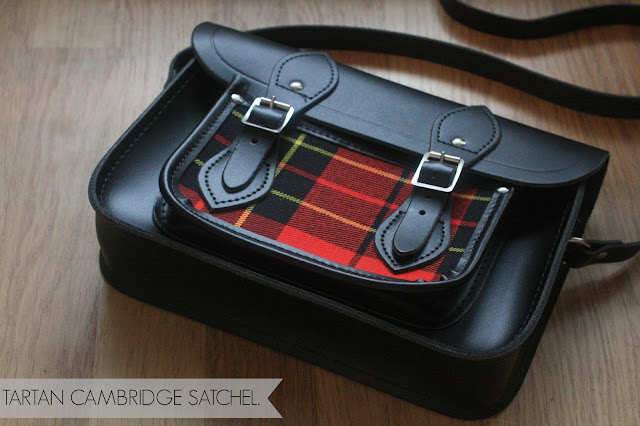
TARTAN CAMBRIDGE SATCHEL.
If there are two fashion trends that have always got the better of me and forced me to the checkout till they are without doubt satchels and tartan. I have more satchels (handbags in general) than any human could possibly require and the fact shops are filled to the brim with tartan for autumn/winter 2013 is not helping my already borderline scottish fancy dress wardrobe. As a teen my fashion choices where debatable and I guess I fell into the emo, scene, goth, whatever category and based the majority of my fashion decisions around the things I saw on music channels such a Kerrang and at my local "alternative nightclub". One day not that far into my experimental teenage phase I got a bit tired of head to toe black and decided to branch out a little introduce colour and pattern, obviously picking tartan, one of the most recognisable prints from the entire punk movement. To this day I still love it and have never really fallen out of love with it so I am totally all over this 90s grunge revival and all the tartan thats comes with it, thank you fashion gods!
Now that I have fully embarrassed myself and let you into a little insight of my teenage years lets get down to business and admire the beauty and craftsmanship that comes in the form of this tartan pocket satchel from the highly adored brand, The Cambridge Satchel Company. My heart jumped out of my chest a little when I saw this bag pop up in the ASOS sale a couple of weeks ago and couldn't pass by on the opportunity of finally getting my mitts on a Cambridge Satchel. For years magazines and bloggers alike have raved about this brand and their almost iconic satchels that I and many another human being had full on fallen for the hype. I am a sucker for a contemporary twist on a classic design and a little British heritage so I have had my beady eyes on one for what feels like a lifetime yet for some reason never committed to buying one despite buying one for a friend on a recent birthday. It is pretty obvious from reading the above as to why this specific colourway was the one for me and I could not be any happy with the product.
This specific 11inch tartan satchel is exclusive to ASOS and is still in stock although no longer in the sale if you fancy picking up one for yourself, retailing at £115 this is by no means a small gift to yourself but if you are like me a fan of quality and craftsman ship you will not be disappointed by this brand. Lets just pretend I didn't just come across the Vivienne Westwood Collaboration and instantly add another to my ever growing handbag wishlist.
Keep up to date on:
Saturday 28 September 2013
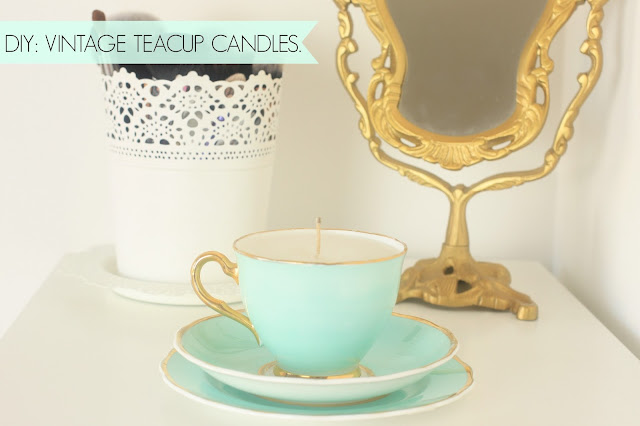
DIY: VINTAGE TEACUP CANDLES.
This is hands down my favourite DIY project I have ever shared on this blog, closely followed by the framed chevron pin boards that hang proudly in my living room! I recently purchased this beautiful vintage teacup and saucer and knew instantly that I wanted to give it a little more purpose in my home other than just a decorative item or tucked away in a cupboard.
As I have seen quite a few teacup candles on the market recently I thought it would be super easy to turn my beloved teacup into one with no problem. I was right! It is so simple to make your own that I'm genuinely annoyed at myself for not making any of my own candles sooner. All you will need is a teacup of your choice, 500g unblended paraffin wax (makes roughly 3 candles), pre waxed candle wicks and some blu tac. Simply blue tac the candle wick into the centre of the teacup. Melt the wax beads using the double boiler method of heating a glass bowl over a pan of boiling water. Once the wax has fully melted simply pour the wax into the teacup and make sure to hold the wick to ensure an upright position. Leave to cool for roughly 3 hours. If you find that the wax has set and formed a well in the centre use a pin to make a few holes and melt some more wax and refill. This project is relatively purse friendly depending on the cost of your chosen teacups so I suggest you head down to your closest car boot and get hunting out some bargains. The rest of the items can be picked up in craft stores or on eBay as linked above.
I am already planning on picking up some more teacups so that I can experiment with colour and scents so watch this space. Family and friends beware, you are all probably going to be receiving teacup candles for christmas!
Keep up to date on:
Tuesday 17 September 2013
RECIPE: CHOCOLATE FUDGE CAKE.
Today we have a very naughty little bake, a chocolate fudge cake with chocolate fudge icing and sprinkles to top! Defiantly not one for those on a diet but perfect for any kind of celebration or you could simply cut it up into bite size portions and hand it out to your nearest and dearest and share a little chocolate fudge cake love. The best thing about this cake is that all the chopping and mixing is done quickly in a food processor, you just need to have everything weighed and ready before you start.
INGREDIENTS FOR THE SPONGE:
100g pecan halves, 1 TSP baking powder, 1/2 TSP bicarbonate of soda, 75g of 70% dark chocolate, 2 TBSP cocoa powder, 200g light muscovado sugar, 100ml of hot black coffee, 2 eggs, 175g unsalted butter and 125ml soured cream.
INGREDIENTS FOR THE ICING:
150g 70% dark chocolate, 25g unsalted butter, 3 TBSP icing sugar and 2 TBSP black coffee.
METHOD:
Preheat the oven to 160ºC/gas 3 and prepare a 25.5 x 20.5 x 5cm cake tin or tray bake tin with baking paper. Sift the flour with the baking powder and bicarbonate of soda and set aside. Put the chocolate in a bowl of a food processor with the cocoa and 100g of the muscovado sugar. Process until the mixture had a sandy texture. With the machine running pour in the hot coffee via the feed tube and process until the chocolate has melted. Stop the machine and scrape down the sides of the bowl. Add the eggs and the rest of the sugar and process for roughly 30 seconds. Scrape down the bowl again and add the butter and run the machine again. Scrape down the bowl once more. Add the soured cream and the flour mixture and process until the mixture becomes a smooth, streak-free batter. Spoon the mixture into the tin and bake for about 45 minutes or until the sponge starts to pull away from the sides. Remove from the oven and run a round bladed knife around the inside of the tin to loosen the sponge. Leave to completely cool within the tin. To make the icing put the chocolate in a small pan with the butter, icing sugar and coffee. Set on the lowest heat possible and stir gently until melted and smooth. Once melted remove from the heat and leave until thick enough thick enough to spread. Cover the top of the cake with icing and chocolate sprinkles and leave to set before cutting.
Keep up to date on:
Friday 13 September 2013
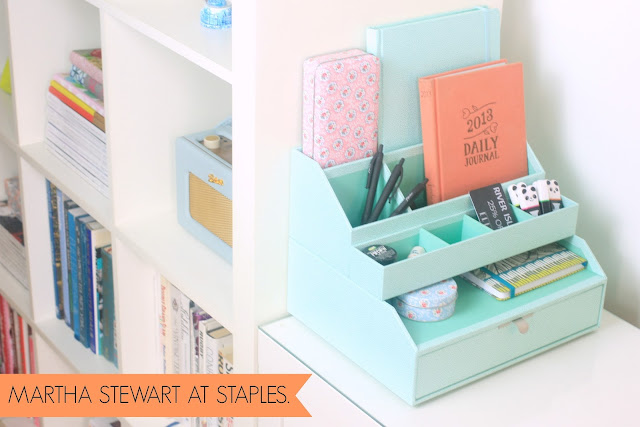
MARTHA STEWART AT STAPLES.
Lets just throw this out there, I am a complete and utter sucker for stationary. I was always that lame kid that used to spend their entire pocket money on highlighters and smelly gel pens and walk away with genuine excitement to get home or to school to show of my latest stationary stash.
For as long as I can remember I have always had a keen interested in art and generally anything that involved making things so it comes as no real surprise that my 23 year old self is still happy to spend my money on pens, inks, paints, notebooks, you name it I probably have its stashed away somewhere in my craft hoard. In an attempt to get my craft/stationary draws into some form of order I decided to invest a little money in these beautiful storage pieces from the Martha Stewart collection exclusively at Staples. Coming in various colour ways and shapes I decided to go with the desktop organiser, draw with inbox and the small item holder and stack it all together to have one designated place on my desk for all my day to day bits and bobs that are usually shoved away in a draw out of sight. Of course no shopping spree in Staples would be complete without me picking up yet another notebook in the form of this lovely matching lined one from the same range. Online there is currently 33% off all the items I have mentioned so I suggest you snap them up now if you fancy sprucing up your office storage!
It is so nice to have a place to store all my unnecessary notebooks, pens and pencils and I have found it even helps me keep on top of all the mundane homeowner junk that needs to be taken care of, success!
Keep up to date on:
Monday 2 September 2013
DIY: MAP GIFT TAGS.
After a recent conversation with a dear friend of mine about how lovely old maps looked when used as gift wrap I thought to myself their must be more ways to up-cycle these beautiful maps into something else special. Following the theme of gift giving I decided to start with something incredibly simple, map gift tags.
This DIY is seriously easy therefore I encourage even my the craft-void readers to have a pop at this one. All you need is some plain gift tags to use as a template/base, a pencil, scissors, a map of any kind, twine/string and any glue of your choice. I chose to use removable photo glue as it is ideal for this type of project as it dries clear, can be removed without damage and will not shrink or wrinkle. All of the items required for this project are readably available in craft stores or via good old eBay. If you don't have any old maps gathering dust in the attic pop to a charity shop or simply print one at home from the internet. To make these tags simply draw around the gift tag onto the back of your map of choice, carefully cut it out, create a hole in line with the template, stick on the map and once dry thread some twine and tie in a knot! I did tell you this one was an easy one, ideal to make with children or for those people that reckon they don't have the time to make things for themselves. I would recommend making a few of these at a time as they are so quick to make and easy to store ready for your next gift giving occasion.
I think this simple DIY adds a real touch of personality to an otherwise basic gift wrap and is suitable for all occasions, ages and genders, winner!
Keep up to date on:
Tuesday 20 August 2013
RECIPE: ASIAN STICKY BEEF SALAD.
This sticky beef salad with asian dressing is the perfect way to spice up a basic salad and an easy way to inject a little asian cuisine into your recipe book! Quick to make and full of flavours this recipe has quickly become a weekly staple in my household. All it takes is a little bit of prep time the night before to chop the fillet steak and throw in all the ingredients for the marinade and you have the quickest tastiest salad I have come across in a longtime.
INGREDIENTS FOR THE MARINADE:
2 fillet steaks, 5 TBSP of light soy sauce, 5 TBSP of sweet chilli sauce, 1 TBSP of chopped ginger, 2 TBSP of honey, 1 clove of garlic, a blob of olive oil, juice and zest of 1 lime, 1 TSP of lemongrass, salt and pepper.
INGREDIENTS FOR THE SALAD:
1 bag of salad leaves, 1 head of pak choi, 1 large carrot, 1 large spring onion, half a bell pepper, a handful of alfalfa shoots, red chillies and coriander.
METHOD:
Firstly marinade the beef fillets over night in the combined ingredients, or for a couple of hours at least. The next day, take the fillets out of the marinade and put the remainder of the sauce in a saucepan. Boil the sauce until it thickens and leave to cool. Cook the fillet in a frying pan until they are how you like them. Chop up the salad and vegetables whilst washing the alfalfa shoots. Serve on a board or in bowl and toss all the ingredients together. For the dressing, pour the cooled down sauce into a jam jar, add 4 parts oil to 1 part vinegar and shake well. Next you need to arrange the sticky beef on the top of the dressed salad. Finally sprinkle as much chilli as you desire and a little coriander to serve.
Follow me on:
Saturday 17 August 2013
YSL BEAUTY.
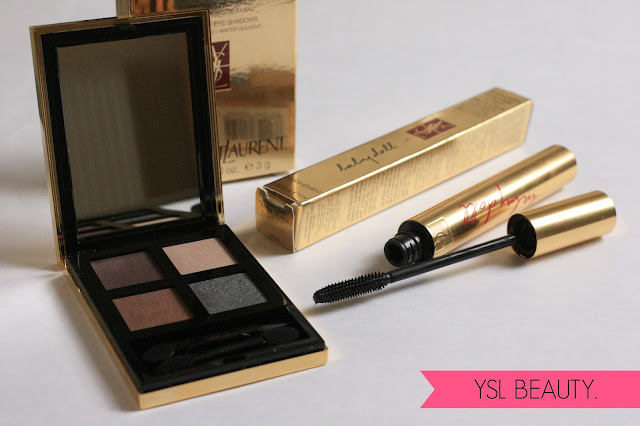
It has been a few months since my last beauty post on the blog, nothing intentional, simply a case of nothing exciting me in the beauty world as of late. That was until I set my eyes on YSL's latest beauty offerings for autumn/winter 2013 in the form of this City Drive Classy Palette in Uptown. Lets just address the elephant in the room here and take a moment to appreciate the beauty that is the packaging of this palette! Gold, black and a contemporary graffiti design is so up my street I couldn't help but have a peak at what treasures would be inside such luxurious packaging. I was not disappointed with what came within, the colour selection in this Uptown palette is a lovely mix of neutrals to make the perfect day to night look - hello perfect! True to its name the colours reflect the city with champagne, marble, concrete and steel. All 4 colours blend well together to create a lovely soft smokey eye but can also be used wet if you want to intensify the look. The YSL palette is currently on sale at Debenhams for £25.20 (linked above) or at YSL counters for the usual price of £42.00.
I'm a big voluminous lashes type of girl and after doing some research this YSL Baby Doll mascara was quickly added this to the top of my wish list. It was pretty much a given that I would throw this in my basket at some point so I thought what a better time than the release of the palette above. I am happy to report this mascara has worked its way up the ranks when it comes to giving you that wide eyed, long, full lash mascara effect. The brush is narrow enough to easily reach your inner lashes but still coat and magnify your normal lashes. This mascara is undeniably pricey retailing at whopping £24.40 but if you fancy treating yourself and you are in need of a new mascara I couldn't recommend this more.
Follow me on:
Friday 16 August 2013
NEW & IMPROVED.
There has been lots of change over here at Ladylike Len as of late including a massive face lift on the blog itself. My old theme was getting me down and didn't reflect the content in the slightest leaving me feeling rather uninspired and generally falling out of love with my little blog. This is where the lovely lady that runs the Beautify My Blog store on Etsy comes in, offering pre-made themes with personalisation available upon request and good value for money, ideal! The service was great and the owner helped me sort out any issues I had with instalment. I could not be happier with the look of my blog now and have already found myself scribbling away in my ideas book coming up with new exiting things to show to you all!
A huge thank you to Beautify My Blog and a little reminder to myself that change can be a good thing.
Follow me on:
Friday 2 August 2013
PHOTO DIARY: AMSTERDAM.
Here are just a few of my favourite photos from my recent trip to Amsterdam.
My boyfriend, friends and I decided to spend a week in Amsterdam to celebrate my recent birthday. Our trip included lots of highlights such as a trip to a pancake house, a late night canal cruise and several exhibitions to just name a few! I had the best time and cannot recommend taking yourself on a trip to Amsterdam enough.
Follow me on:
Subscribe to:
Posts (Atom)
©
At Number 43 | All rights reserved.


